

Introduction
Travel photography is more than just snapping photos of scenic landscapes and exotic locations; it’s about capturing the essence of your journey, telling stories, and preserving memories. Whether you’re exploring bustling cities, tranquil beaches, rugged mountains, or cultural landmarks, each destination offers unique opportunities for photography that can help you remember not just what you saw, but how you felt. This guide will take you through everything you need to know to take your travel photography skills to the next level and capture memories like a pro.
Chapter 1: Understanding Travel Photography
1.1 The Essence of Travel Photography
At its core, travel photography is a blend of landscape, portrait, architecture, and street photography. It encompasses everything you encounter during your travels: breathtaking vistas, candid moments of local life, intricate architectural details, and the vibrancy of cultural festivals. The aim is to create images that evoke the emotions, sounds, smells, and atmosphere of a place, transforming a simple snapshot into a compelling narrative.
1.2 The Role of Storytelling in Travel Photography
Good travel photography isn’t just about having the latest camera gear or perfect composition. The best travel photographers are storytellers who use their images to convey a sense of place and time. Whether it’s the joy in the face of a child playing in the streets of Morocco or the serenity of a sunrise over the Alps, your photos should communicate the emotions and stories behind the scenes you capture. Understanding the importance of storytelling in your photography will make your images more engaging and memorable.
1.3 The Challenge of Travel Photography
Travel photography presents unique challenges. Unpredictable weather, limited time, and unfamiliar environments can all make it difficult to get the shot you want. You might be photographing in harsh sunlight one minute and in dimly lit interiors the next. To navigate these challenges, you need to be adaptable, patient, and creative.
Chapter 2: Preparing for Your Photography Journey
2.1 Choosing the Right Gear
The gear you choose for travel photography can have a big impact on the quality of your images and your overall experience. Here’s a breakdown of essential equipment:
- Cameras: While DSLRs and mirrorless cameras offer the best image quality and control, they can be bulky. Many photographers prefer lighter, more compact cameras for travel, such as high-end point-and-shoots or mirrorless cameras with interchangeable lenses.
- Lenses: A versatile lens setup is crucial. A zoom lens like an 18-200mm can cover a wide range of focal lengths, allowing you to shoot everything from wide landscapes to distant subjects without carrying multiple lenses. Consider also packing a prime lens, like a 50mm or 35mm, for sharper images and low-light situations.
- Tripods: A travel-friendly tripod is essential for low-light photography, long exposures, and capturing sharp images. Look for a lightweight, compact model that can easily fit in your bag.
- Accessories: Don’t forget extra batteries, memory cards, a cleaning kit, and a reliable camera bag. A polarizing filter can help reduce glare and enhance colors, while a neutral density filter can allow for longer exposures during daylight.
2.2 Planning Your Photography Trip
Preparation is key to successful travel photography. Research your destination ahead of time to identify the best locations and times for shooting. Consider factors like:
- Weather: Check the weather forecast so you can be prepared for different conditions.
- Lighting: The best times for photography are usually during the golden hours (shortly after sunrise and before sunset), when the light is soft and warm. Midday light can be harsh and unflattering, so use this time for scouting locations or taking a break.
- Cultural Sensitivity: Be aware of local customs and traditions. In some cultures, photographing people or certain places may be considered disrespectful. Always ask for permission before taking someone’s photo and be mindful of local etiquette.
- Safety: Some areas may be risky for photographers, especially if you’re carrying expensive gear. Research the safety of your destination and take precautions like using discreet camera bags and avoiding shooting in isolated areas at night.
2.3 Traveling Light
One of the biggest challenges of travel photography is balancing the desire to bring all your gear with the need to travel light. Carrying too much equipment can be cumbersome and draw unwanted attention. Prioritize your gear based on your destination and shooting style, and remember that the best camera is the one you have with you.
Chapter 3: Techniques for Capturing Stunning Travel Photos
3.1 Mastering Composition
Composition is one of the most important aspects of photography. A well-composed photo draws the viewer’s eye to the subject and creates a sense of balance and harmony. Here are some composition techniques to keep in mind:
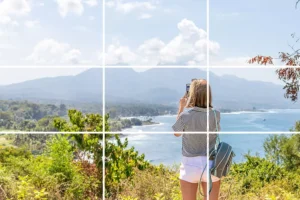
- Rule of Thirds: Imagine your frame divided into a grid of nine equal parts. Placing your subject along these lines or at their intersections creates a more balanced and interesting composition.
- Leading Lines: Use natural or man-made lines, such as roads, rivers, or buildings, to lead the viewer’s eye toward your subject.
- Framing: Incorporate natural elements, such as trees, arches, or windows, to frame your subject and add depth to your image.
- Symmetry and Patterns: Look for symmetry in architecture or patterns in nature to create visually striking images.
3.2 The Power of Light
Lighting can make or break a photo. Understanding how to use light effectively will elevate your travel photography:
- Golden Hour: The soft, warm light just after sunrise and before sunset is ideal for capturing landscapes, cityscapes, and portraits.
- Blue Hour: The period of twilight after the sun has set but before the sky is completely dark creates a moody, ethereal quality that’s perfect for night photography.
- Diffused Light: On overcast days, the clouds act as a giant softbox, diffusing the light and reducing harsh shadows, making it a great time for portrait and architectural photography.
- Backlighting: Positioning your subject with the light source behind them can create dramatic silhouettes or beautiful rim lighting around their edges.
3.3 Capturing the Local Culture
One of the most rewarding aspects of travel photography is documenting the local culture. Here are some tips for capturing authentic moments:
- Portraits: Candid portraits of locals can tell powerful stories. Engage with your subjects, show respect, and always ask for permission before photographing them.
- Street Photography: Cities and towns are full of life and movement. Capturing the hustle and bustle of the streets can provide a unique glimpse into daily life. Be patient and wait for the right moment to capture spontaneous scenes.
- Festivals and Events: If your travel coincides with local festivals or events, take advantage of the vibrant colors, costumes, and activities. Research the event beforehand so you know what to expect and where to position yourself for the best shots.
- Details: Don’t overlook the small details that can capture the essence of a place, such as food, art, textiles, and architecture. These images add depth and variety to your travel portfolio.
3.4 Landscape Photography
Landscapes are a staple of travel photography. Here’s how to capture stunning vistas:
- Foreground Interest: Including an element in the foreground, such as rocks, flowers, or a person, adds depth and scale to your landscape images.
- Reflections: Bodies of water, such as lakes, rivers, or even puddles, can create beautiful reflections that enhance your composition.
- Wide-Angle Lenses: A wide-angle lens allows you to capture the vastness of a landscape, drawing the viewer into the scene. Be mindful of distortion, especially with horizons.
- Panoramas: Stitching together multiple images can create expansive panoramic shots that capture the full breadth of a landscape. Many cameras have a built-in panorama mode, or you can use post-processing software.
3.5 Night and Low-Light Photography
Night photography requires a different set of skills and equipment. Here’s how to tackle low-light situations:
- Tripod: A tripod is essential for keeping your camera steady during long exposures.
- Long Exposures: Use a slow shutter speed to capture light trails, starry skies, or illuminated landmarks. Experiment with different exposure times to get the desired effect.
- High ISO: In very low light, you may need to increase your ISO to get a properly exposed image. Be cautious, as higher ISOs can introduce noise to your photos.
- Light Painting: Using a small flashlight or your phone, you can “paint” light onto your subject during a long exposure, creating interesting effects.
Chapter 4: Editing and Post-Processing
4.1 The Importance of Post-Processing
Post-processing is a crucial step in travel photography. It allows you to enhance your images, correct any issues, and bring your artistic vision to life. Even a simple edit can make a big difference, turning a good photo into a great one.
4.2 Basic Editing Techniques
Here are some basic editing techniques that every travel photographer should master:
- Cropping: Adjust your composition by cropping your image. This can help you eliminate distractions and improve framing.
- Exposure and Contrast: Correct underexposed or overexposed areas and add contrast to make your images pop.
- Color Correction: Adjust the white balance and color saturation to achieve the desired look. Warm up a sunset photo or cool down a scene shot in the shade.
- Sharpening: Use sharpening tools to enhance details, especially in landscape and architectural shots.
- Noise Reduction: Reduce noise in low-light photos to create cleaner images.
4.3 Advanced Editing Techniques
For more advanced editing, consider these techniques:
- HDR (High Dynamic Range): Combining multiple exposures into a single image can help you capture a wider range of light and shadow, especially in high-contrast scenes.
- Panoramas and Stitching: Combine multiple images to create panoramic shots or stitch together images for a larger, more detailed final photo.
- Selective Editing: Use selective editing tools like brushes and masks to make adjustments to specific areas of your photo without affecting the entire image.
- Creative Filters and Effects: Experiment with creative filters, such as vignettes, black and white conversions, or color grading, to give your images a unique look.
4.4 Choosing the Right Editing Software
There are many editing software options available, from beginner-friendly mobile apps to professional-grade desktop programs. Here are a few popular choices:
- Adobe Lightroom: A powerful and versatile tool for organizing and editing photos, Lightroom is a favorite among travel photographers for its ease of use and extensive editing capabilities.
- Adobe Photoshop: For more advanced editing, such as compositing or detailed retouching, Photoshop offers a wide range of tools and features.
- Affinity Photo: A more affordable alternative to Photoshop, Affinity Photo offers many of the same features and is a great option for photographers on a budget.
- Mobile Apps: Apps like Snapseed, VSCO, and Adobe Lightroom Mobile allow you to edit photos on the go, making them ideal for quick adjustments during your travels.
Chapter 5: Sharing Your Travel Photography
5.1 Building an Online Presence
Sharing your travel photography online can help you connect with other photographers, inspire others, and even build a following. Here are some ways to share your work:
- Social Media: Platforms like Instagram, Facebook, and Pinterest are great for sharing your travel photos and reaching a large audience. Be sure to use relevant hashtags and engage with your followers to grow your presence.
- Photography Blogs: Starting a photography blog allows you to share not only your photos but also your stories and tips with a wider audience. Blogging platforms like WordPress or Medium are easy to set up and use.
- Photo Sharing Sites: Sites like 500px, Flickr, and Unsplash allow you to showcase your work to a photography-focused community. These platforms also provide opportunities for feedback and exposure.
5.2 Creating a Portfolio
If you’re serious about travel photography, consider creating an online portfolio to showcase your best work. A professional-looking portfolio can help you attract clients, secure photography gigs, or even get featured in publications. Use platforms like Squarespace, Adobe Portfolio, or SmugMug to create a visually appealing and easy-to-navigate portfolio.
5.3 Printing Your Travel Photos
In the digital age, printing photos is often overlooked, but there’s something special about holding a physical print of your work. Consider creating photo books or printing large-format images to display in your home or share with others. High-quality prints make for great souvenirs and gifts, allowing you to relive your travels in a tangible way.
Chapter 6: Ethical Considerations in Travel Photography
6.1 Respecting Local Cultures
As a travel photographer, you have a responsibility to respect the people and places you photograph. Always be mindful of local customs and traditions, and never take photos that could be considered intrusive or disrespectful. Building a connection with your subjects and seeking their permission is essential to capturing authentic, respectful images.
6.2 Avoiding Exploitation
Travel photography can sometimes blur the line between documentation and exploitation, especially when photographing people in less developed regions. Be conscious of the power dynamics at play and strive to represent your subjects with dignity and respect. Avoid “poverty tourism” photography, where the focus is solely on the hardships of a community without offering any context or understanding.
6.3 Environmental Responsibility
When photographing natural landscapes, be mindful of your environmental impact. Stick to marked trails, avoid disturbing wildlife, and leave no trace. As a travel photographer, you have the opportunity to raise awareness about environmental issues and inspire others to protect the natural world through your images.
Conclusion: Embracing the Journey
Travel photography is as much about the journey as it is about the destination. It’s about immersing yourself in new experiences, connecting with people, and seeing the world through a different lens. By mastering the technical aspects of photography, honing your storytelling skills, and embracing the challenges of travel, you can capture memories that will last a lifetime.
Remember, the best travel photos aren’t necessarily the ones with the most perfect composition or lighting—they’re the ones that transport you back to a moment in time and make you feel something. So go out there, explore, and let your camera be your guide.
Happy travels, and happy shooting!


Leave a Reply